
Let’s dive into the world of Instagram Reels and safe zones. This little guide will help ensure that your content shines and the important stuff doesn’t get cut off. Whether you’re a seasoned creator or just starting, understanding safe zones and these tips and tricks is the secret sauce to making your Reels look professional.
What are Safe Zones?
Alright, imagine your Instagram Reel is a pizza. The safe zones? They’re like the cheesy, delicious center slices everyone fights over, while the margins are those crusty edge pieces some people leave behind.
You’ve got two main zones to work with: the central area, which is where you pile on all the good stuff—your text, logos, key visuals. This is where you want to keep the extra cheese and all the tasty toppings. Then you’ve got the margins, which are like the crust. Sure, they’re important and can handle the less flashy stuff, but they’re not the main event. Keep your pepperoni and extra cheese in the center, and let the crust do its thing on the edges. There are some other ingredients you’ll want to keep in mind for your Reels will be as yummy as a hot pizza right out of the oven!
Current Instagram Reels Guidelines
As of the latest updates in 2025, here are the current guidelines and dimensions for Instagram Reels:
Instagram Reels Dimensions:
- Aspect Ratio: 9:16
- Resolution: 1080 x 1920 pixels
- Safe Zones:
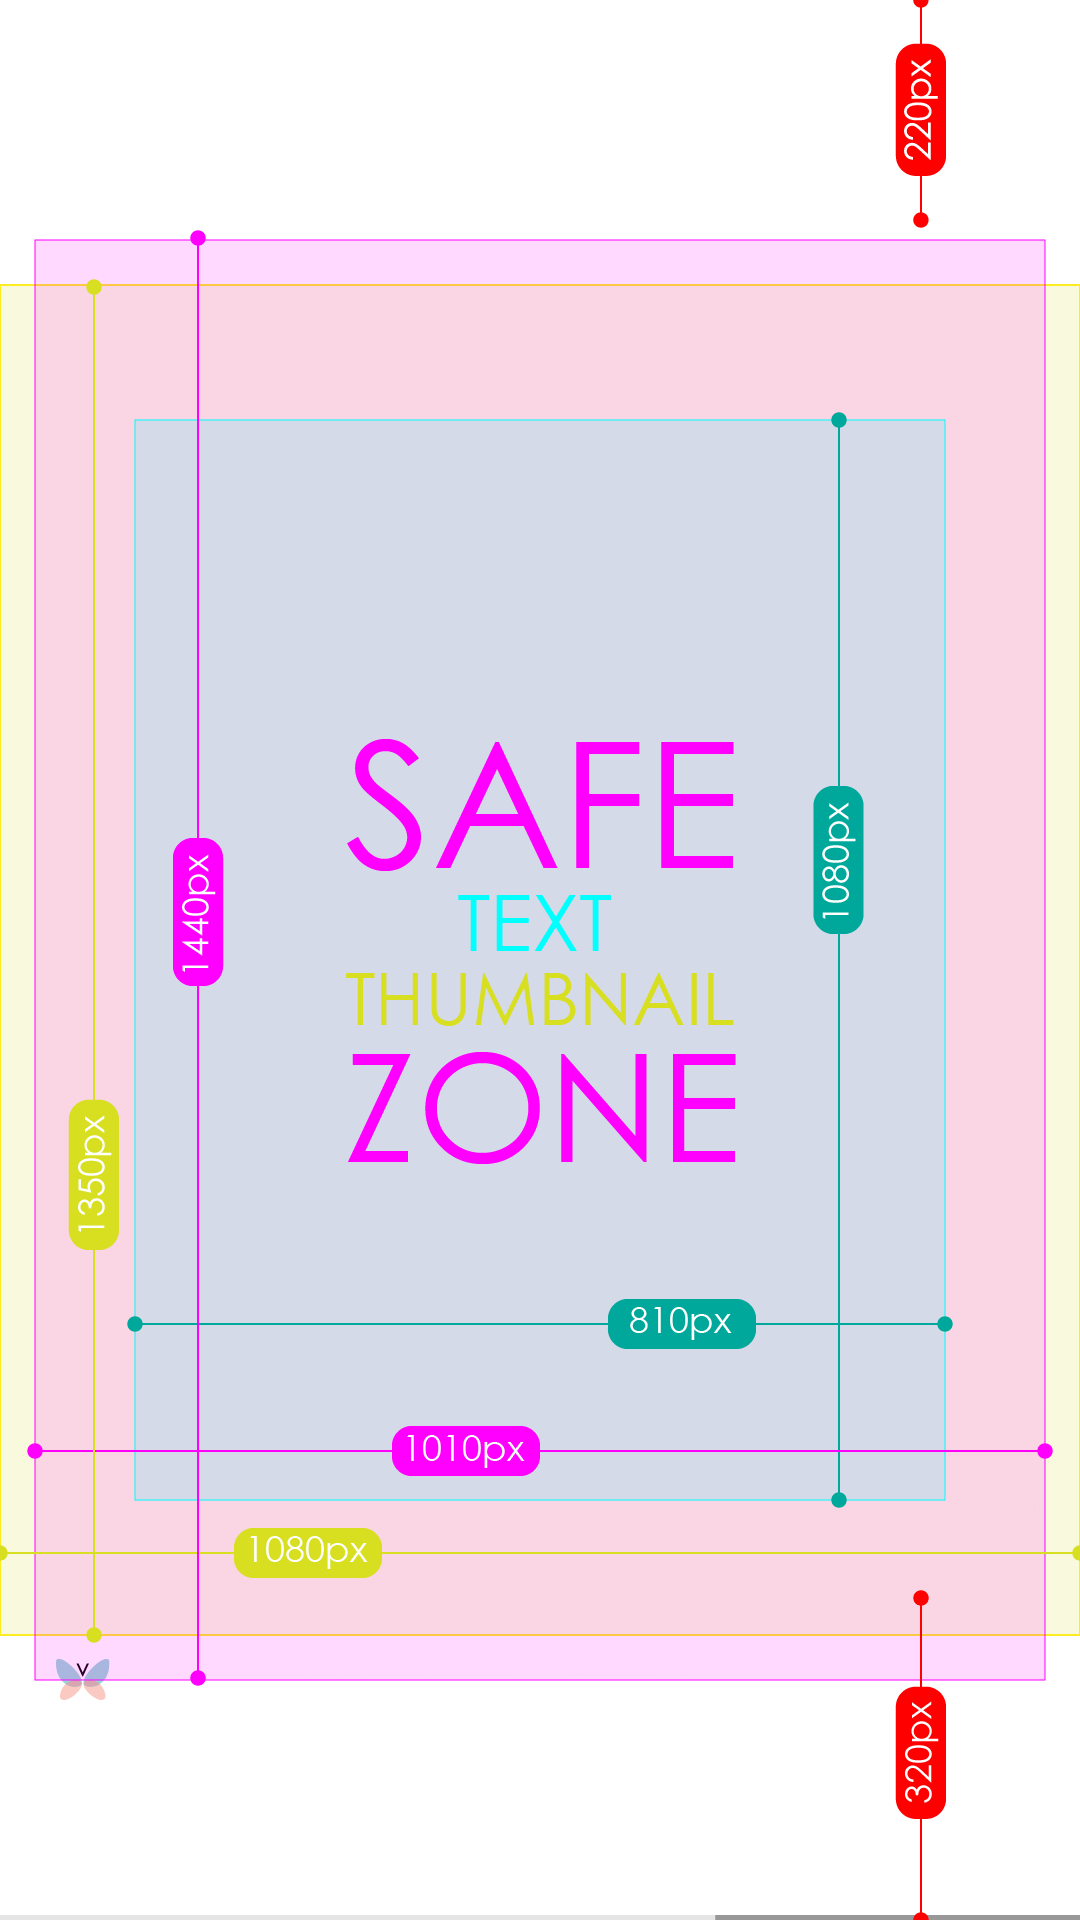
- Central Safe Zone: 1010 x 1440 pixels
- Top and Bottom Covered Zones: Top 220 pixels each and Bottom 320px (often covered by app interface elements such as the username, caption, and action buttons).
Key Guidelines for Creating Instagram Reels:
- Duration:
- Up to 20 minutes: You can now record reels up to 20 minutes.
- 3-minute sweet spot: The Reels limit doubled from 90 seconds to 3 minutes in January of 2025.
- Pro tip: Longer isn’t always better—tailor your Reel length to your story, audience attention span, and the format you’re rocking (tutorial, behind-the-scenes, or mini-vlog).
- File Format:
- Video files should be in MP4 or MOV format.
- Frame Rate:
- The recommended frame rate is 30 frames per second (fps).
- Audio:
- Use high-quality audio and ensure it’s clear. Instagram allows you to add music, voiceovers, and sound effects directly within the app.
- Captions and Text:
- Place any text, stickers, or important visual elements within the text and graphics 810 x 1080 pixels safe zone to ensure they are not cut off by the app’s interface.
- Thumbnails:
- The cover photo or thumbnail for your Reel should also follow the 9:16 aspect ratio and can be customized. Because the thumbnail crop is portrait, make sure the key visual elements are within the centered 1080 x 1350 pixels thumbnail zone.
- Orientation:
- Always shoot in vertical orientation to make the most of the full-screen experience on mobile devices.
Best Practices:
- Engaging Content:
- Hook your audience within the first few seconds to ensure they keep watching. This could be through captivating visuals, intriguing questions, or a quick preview of what’s coming. Engaging content should always begin with a script.
- Lighting and Sound:
- Good lighting and clear sound are crucial. Natural light is great, but ring lights or softbox lights can also provide excellent results. Use a microphone if necessary to enhance audio clarity.
- Editing:
- Instagram’s built-in editing arsenal has gone from “basic trim-and-post” to a surprisingly powerful mini-studio—no third-party apps required. Here’s what’s new:
- Standalone “Edits” App & In-App Parity: Instagram’s standalone Edits app features—like timeline trimming, multi-clip splitting, speed controls, and an “Ideas” tab—are now fully baked into the main Reels editor.
- Keyframes & Transitions: You can animate clip scale, position, and rotation with built-in keyframes and apply polished transitions directly in Reels.
- AI-Powered Audio Enhancements: One-tap “Voice Enhance” cleans up background noise and generative captions auto-transcribe and stylize subtitles.
- Green Screen & AI Animation: The green-screen filter is now in-app, and early AI tools hint at future text-to-video effects and virtual set swaps.
- Project Management & Insights: Save Reels drafts by theme and access real-time metrics (skip rate, reach, saves) right in the editor.
- You can also use third-party mobile apps such as Cap Cut or InShot for more advanced editing before uploading.
- Instagram’s built-in editing arsenal has gone from “basic trim-and-post” to a surprisingly powerful mini-studio—no third-party apps required. Here’s what’s new:
- Hashtags and Captions:
- Use a few relevant hashtags and captions to give a slight boost to discoverability. Engaging captions can also encourage viewers to interact with your Reel.
- Trends:
- Keep an eye on trending sounds, challenges, and formats. Participating in trends can boost your visibility and engagement.
Updates and Features:
- Remixes:
- Similar to TikTok’s duets, you can remix other users’ Reels, adding your spin to their content.
- Interactive Elements:
- Use stickers, polls, and questions to make your Reels interactive and engaging. Upgrade to premium and add the ability to add links to your Reels.
- Collaborations:
- Instagram allows you to collaborate on Reels, making it easier to co-create content with other users.
Keeping these guidelines and dimensions in mind will help you create Reels that are visually appealing and optimized for engagement on the platform.

Tips for shooting, framing and editing Instagram Reels
Tip #1: Know Your Dimensions
First things first, let’s talk dimensions. Instagram Reels are displayed in a 9:16 aspect ratio, which translates to a 1080×1920 resolution. Within this frame, the top 220px and bottom 320 pixels are often covered by the app interface, leaving you with a central zone of 1010×1440 pixels. Keep your key content or action within this area to ensure nothing gets chopped off.
Tip #2: Frame It Right
Framing your shots is all about angles and positioning. When you’re shooting your video, keep the main action and important elements centered. This ensures that even if the edges are cropped or covered by UI elements, your viewers won’t miss out on the good stuff.
Tip #3: Use Guidelines and Grids
Most cameras and editing apps have built-in grid features. Use these to your advantage! They help you keep everything aligned and within the safe zones. (You can also download our safe zone guide below.) When setting up your shots, imagine a tic-tac-toe board over your screen. Keep the key elements along the lines and intersections to create a balanced and visually appealing composition.
Tip #4: Mind the Text
Text is a powerful tool in your Reels, but only if people can read it! Avoid placing text too close to the edges. Instead, keep it within the text safe zone (The cyan box in our guide below). This not only makes your text readable but also ensures it stands out against the app’s interface.
Tip #5: Play with Movement
Reels are all about dynamic content. When planning your shots, think about movement and how it will play out within the safe zones. Whether it’s a dance, a tutorial, walking into frame or a quick pan across a beautiful scene, make sure the main action stays within the central area to keep it in the spotlight.
Tip #6: Edit Like a Pro
Editing is where the magic happens. Use editing tools to crop, align, and adjust your video to fit perfectly within the safe zones. Pay attention to the overlays and transitions, making sure they enhance your content without distracting from the main message.
Tip #7: Test and Review
Before hitting that publish button, take a moment to preview your Reel. Instagram lets you see how your video will look once it’s live. Use this feature to check if everything is within the safe zones and looks just right. Make adjustments if needed and give it another look.
Keeping these guidelines and dimensions in mind will help you create Reels that are visually appealing and optimized for engagement on the platform.
Bonus Trick: Engage with the Interface
Get creative with the app’s interface! Use stickers, text, and interactive elements to guide your viewers’ attention. This not only makes your Reels more engaging but also ensures your message stays front and center.
Free Instagram Reels Safe Zone Guide Download
We’ve provided an Instagram Reel Safe Zone free downloadable below:

INSTRUCTIONS: Please keep in mind that mobile device screen dimensions vary. Because of this, we include the primary safe zone indicated by the magenta area in addition to the text and graphics safe zone indicated by the cyan area. The thumbnail area is yellow and indicates the 1080 x 1350px thumbnail crop area. How to use? Download the image > Add the image to the top layer of your editing timeline with opacity (For mobile applications like InShot or CapCut use PiP or Overlay) > Edit away! > Remove the guide image when you’re ready to export.
There you have it, folks! With these tips and tricks, you’ll be navigating Instagram Reels like a pro. Remember, it’s all about keeping your key content visible and engaging. Now get out there and create something amazing, frame it, edit it, and dazzle your audience.
Trust your struggle but remember when your business is growing and ready to outsource it to pros, Verve Creative Studio is here to help you achieve your content creation goals. Happy creating!


